Python Training by Dan Bader

Generate and host your API documentation for free with open-source tools

How to generate documentation for a RESTful API as part of your continuous integration build and then automatically deploy it to a website. Includes a full example project on GitHub.

For a recent project I worked on a distributed system that communicated internally through RESTful APIs. The implementation work was distributed around different teams working across several timezones.

Early on we identified integrating the different systems as one of the likely challenges for the project. To reduce the communication risk, we decided to follow a shared set of API design guidelines across all systems.

The goal was to have up-to-date API documentation for each system available at all times. We used a combination of tools and automated workflows that’s been working out well for the project.

In this article I’d like to share the approach we used for auto-generating our API documentation. We used the apiDoc documentation generator, automated builds for the documentation on CI, and automated deploys of the generated documentation to a website.


Tl;dr: Here’s what we’re going to build in this tutorial: apidoc-example.surge.sh


Table of Contents

  1. Intro to apiDoc
  2. Hosting your API docs
  3. Setting up auto-deploys
  4. A full, live example on GitHub

1. Intro to apiDoc

apiDoc is a command-line tool for generating API documentation directly from annotations in the source code of your app. Its syntax is similar to JavaDoc and relatively easy to pick up.

apiDoc works with most popular programming languages, which means you can use the same annotation syntax across multiple projects in a polyglot environment.

To give you a taste of apiDoc’s syntax, here are some example annotations describing a simple endpoint on a RESTful API. I’m using Python as an example here but things would look similar for JavaScript or Ruby:

@app.route('/api/v1/random/', method=['OPTIONS', 'GET'])
def get_random_number():
    """
    @api {GET} /v1/random/ Generate a random number
    @apiName GetRandomNumber
    @apiGroup Random

    @apiDescription Generates a random number in the range `[0.0, 1.0)`.

    @apiSuccess (Success 200) {UUID}   request_id Unique id for the request
    @apiSuccess (Success 200) {Number} results    Random number in `[0.0, 1.0)`

    @apiSampleRequest /v1/random/

    @apiExample cURL example
    $ curl https://apidoc-example.herokuapp.com/api/v1/random/

    @apiSuccessExample {js} Success-Response:
        HTTP/1.0 200 OK
        {
            "request_id": "ad506913-a073-4d23-9f95-388d1c1e2c46",
            "result": 0.3606252123151169
        }
    """
    # ...

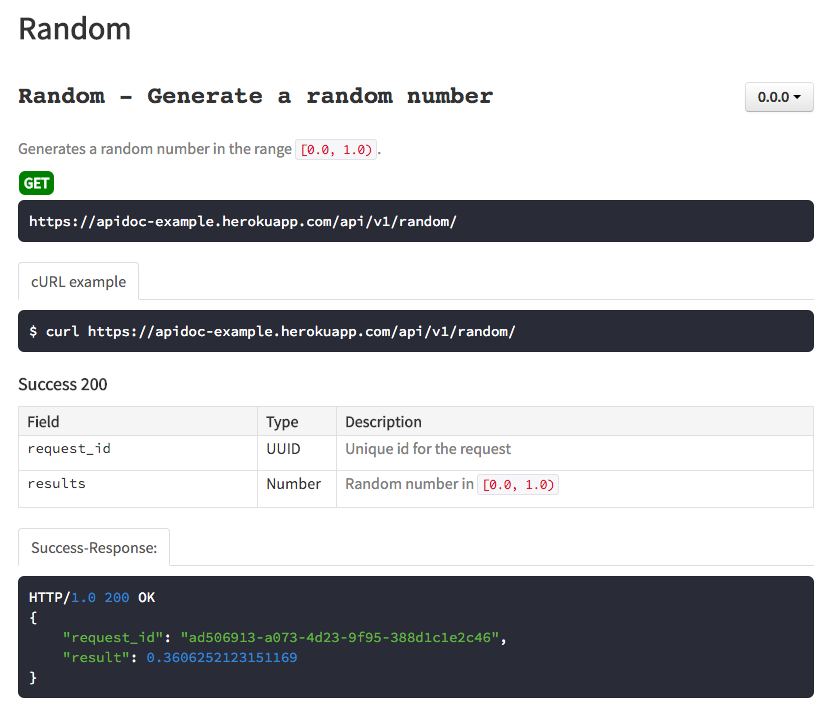
apiDoc parses out these annotations and then generates a static website with API documentation meant for people to read. Here’s an example of what that website export looks like:

The standard website template that comes with apiDoc looks fairly clean and organized. You can fully customize the look and feel, for example, to use your company branding.

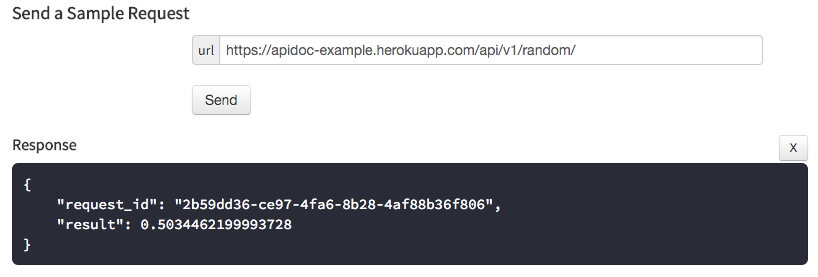
The sites generated by apiDoc also include fancy features like the ability to send a sample request to your API directly from the website and inspect the returned result. Here’s what that looks like1:

Setting up apiDoc

Now I want to walk you through setting up apiDoc. Let’s install apiDoc and generate our first set of docs. The first thing you’ll need to do is install the apiDoc command-line client from npm:

$ npm install apidoc

Let’s assume the code for your web app that provides the API lives in a folder called app/. We’ll also asume there’s one source code file in the app/ folder that includes the example apiDoc annotations for the GetRandomNumber endpoint we saw earlier.

To generate the website-based API documentation and save it in the apidocs/ folder you’ll need to run the following command:

$ apidoc -i ./app/ -o ./apidocs/

Once the apidoc command completes successfully you can open apidocs/index.html in a browser and check out your generated docs.

Well, that was easy!

2. Hosting your API docs

Next, we’re going to figure out how to deploy our API docs generated with apiDoc to a public website. My tool of choice for this job is Surge.

Surge’s pitch is “simple, single-command web publishing” and that’s pretty accurate. It’s like a nice command-line interface for Amazon S3 and they offer a free pricing tier that I found perfect for hosting API docs2.

Surge also provides you with a free (your-project).surge.sh subdomain which is great for referencing the latest version of your API documentation from another website or document.

Deploying to Surge

Now that you’re hopefully sold on Surge3, let’s move right on and set up a deploy command that takes the generated HTML docs and puts them on a website.

First, install the Surge command-line client from npm:

$ npm install surge

At this point you should already have your apiDoc website export sitting in the apidocs/ directory. Now we’ll do the first deploy through Surge. As part of this step the Surge client let’s you create a free Surge account when you run the following command:

$ surge apidocs/

When the Surge client asks for a domain, feel free to change the randomly generated subdomain to something more suitable, for example myproject-api.surge.sh. If the subdomain is available it will be associated with your Surge account and you can re-use it in subsequent deploys (no one else will be able to steal the domain from you).

As the surge apidocs/ command executes it informs you of its progress in the terminal:

Welcome to Surge! (surge.sh)
Please login or create an account by entering your email and password:

           email: youremail@example.com
        password: *************
    project path: apidocs
            size: 68 files, 598.9 KB
          domain: myproject-api.surge.sh
          upload: [====================] 100%, eta: 0.0s
propagate on CDN: [====================] 100%
            plan: Free
           users: youremail@example.com
      IP address: 123.124.125.126

Success! Project is published and running at myproject-api.surge.sh

Once the Surge deploy is complete you can access the API docs with a web browser at myproject-api.surge.sh (or whatever other subdomain you picked in the previous step).

If all we need are manual deploys then we’re done at this point.

We can simply refresh the deployed docs by running the apiDoc and Surge commands again. However we might be able to save a lot of time by automating that process and putting it on our continuous integration server.

Keep reading if you want to learn how that works.

3. Setting up auto-deploys

I’m a fan of continuous deploy workflows. Regenerating API documentation from source code annotations is something that can and should be automated.

Let me walk you through the (mostly automated) workflow I use to export API docs with apiDoc to a public website.

The general idea is to:

  • build the docs on a continuous integration server using the apiDoc command-line tool; and
  • then to publish them somewhere, so everyone on your team can access the docs with a web browser.

For the continuous integration service I’m going to go with Travis CI in this example. They offer hosted build servers that are free for use in open-source projects.

Defining npm scripts for our build

Before we charge ahead and configure Travis CI, let’s take 3 minutes to clean up our build process a little.

We’ll define two npm scripts in the npm package.json for our project. This is generally a good practice so we don’t have to remember the specifics of how we’re calling the apidoc or surge command-line tools4.

This is what our package.json is going to look like:

{
  "devDependencies": {
    "apidoc": "0.15.1",
    "surge": "0.17.7"
  },
  "scripts": {
    "apidocs": "apidoc -i ./app/ -o ./apidocs/",
    "apidocs-deploy": "surge -p ./apidocs/ -d apidoc-example.surge.sh"
  }
}

The npm scripts defined here simply contain the commands we went through earlier:

  • npm run apidocs builds the static HTML for the docs; and
  • npm run apidocs-deploy deploys the static HTML to Surge with a custom subdomain.

Travis CI (build server)

Now that we streamlined our build process a little, let’s set up continuous integration to automate these steps.

Travis CI offers hosted build servers that are free for use in open-source projects. That makes them perfect for use in this example5.

Travis CI is pretty easy to configure for a project hosted on GitHub. The focus of this tutorial is on setting up apiDoc, so for a detailed explanation of how to set up Travis CI you’ll want to check out the Travis CI documentation.

The most important thing to know is that Travis is configured through a config file in the root folder of your project called .travis.yml. This is what a .travis.yml for a simple project might look like:

language: python

python:
    - "2.7"

install:
    - pip install -r requirements.txt
    - npm install

script:
    - run_tests.sh
    - npm run apidocs

deploy:
    provider: script
    script: npm run apidocs-deploy
    skip_cleanup: true
    on:
        branch: master

You can see that we’re using the npm run apidocs and npm run apidocs-deploy scripts we set up earlier. We’re also configuring a Travis CI deploy script that will only execute when Travis builds the master branch.

At this point we should be able to build the docs Travis, but to deploy them to Surge you need to provide the credentials for your Surge account.

Deploying to Surge from CI

Because we don’t want to put our Surge username and password into a script inside our repo, we need to configure the Surge client to take the credentials from environment variables.

To do that we first need to grab the Surge token for our account. Run the following command to get the token:

$ surge token

Surge - surge.sh

    email: youremail@example.com
    token: 13371e4c9b93f3f0682250b6cf8331b

Next, we’ll take the email address and token and configure the following two environment variables on Travis CI:

SURGE_LOGIN=youremail@example.com
SURGE_TOKEN=13371e4c9b93f3f0682250b6cf8331b

If you want to verify that the token works correctly you can run the following command on your machine. It should successfully deploy the API docs like in the previous part of the tutorial:

$ SURGE_LOGIN=... SURGE_TOKEN=... npm run apidocs-deploy

Let’s stop for a second and talk about the security of those keys.

You might wonder what happens if someone submits a pull-request against that repository. Wouldn’t they be able to just print out the keys and steal them?

This is what the Travis CI docs say:

”[…] we do not provide these values to untrusted builds, triggered by pull requests from another repository.” – Travis CI Docs

That’s good to know. Unless we accidentally merge a “malicious” pull-request no-one should be able to steal our keys6.

The first deploy

Once you’ve set up Travis CI and made the necessary configuration changes and pushed them up to GitHub, you should see the first build complete on CI.

It should auto-deploy your docs. This means from now on you should never have to manually deploy the docs again. You just merge to master and CI will refresh the docs and deploy them.

Hopefully that’ll save you and your team quite a bit of time in the long run!

4. A full, live example on GitHub

Here’s a full example of the above setup that you can use as a blueprint for your own API documentation efforts. It generates API docs for a simple Flask app with the process I laid out in this article. You can see the resulting API docs at apidoc-example.surge.sh.

Go check out the project here: github.com/dbader/apidoc-example


  1. This is a bit of a gimmick really, but if your API is public and doesn’t require authentication it can be a nice addition and make the docs a little more lively. 

  2. If you’re okay with the fact that your docs are publicly available on the internet. Surge provides a paid plan with password protection that’s certainly worth the money if you need that feature. 

  3. Did I tell you they’re a local company from Vancouver run by a group of excellent and smart designers and engineers? 😃 

  4. Alternatively you could use a Makefile for this job or just a simple shell script. 

  5. Continuous integration for the project I worked on for my client was hosted on CircleCI which is a similar service that I can also recommend. 

  6. It’s probably still a good idea to use a separate Surge account for each project. 

<strong><em>Improve Your Python</em></strong> with a fresh 🐍 <strong>Python Trick</strong> 💌 every couple of days

Improve Your Python with a fresh 🐍 Python Trick 💌 every couple of days

🔒 No spam ever. Unsubscribe any time.

This article was filed under: craftsmanship, programming, python, and web-development.

Related Articles:
Latest Articles:
← Browse All Articles