How to write a great README for your GitHub project
A great README file helps your project to stand out from the sea of open-source software on GitHub. In this article I go over the key elements every README for an open-source project should contain. It also includes a README.md template for use in your own projects.

Developers release new open-source projects on GitHub every day. As a result it’s becoming more and more difficult to get your own project to stand out from the sea of open-source software. However you can do a few things to increase your chances of grabbing other developers attention. One effective and simple technique is putting up a nice-looking and helpful README file.
In my books, every README should cover at least the following:
- What your project does
- How to install it
- Example usage
- How to set up the dev environment
- How to ship a change
- Change log
- License and author info
I’ll go over these points one by one now. At the end of the article you’ll also find a README.md template you can use in your own projects.
Let’s get started! Here’s what your README should contain:
1. What your project does
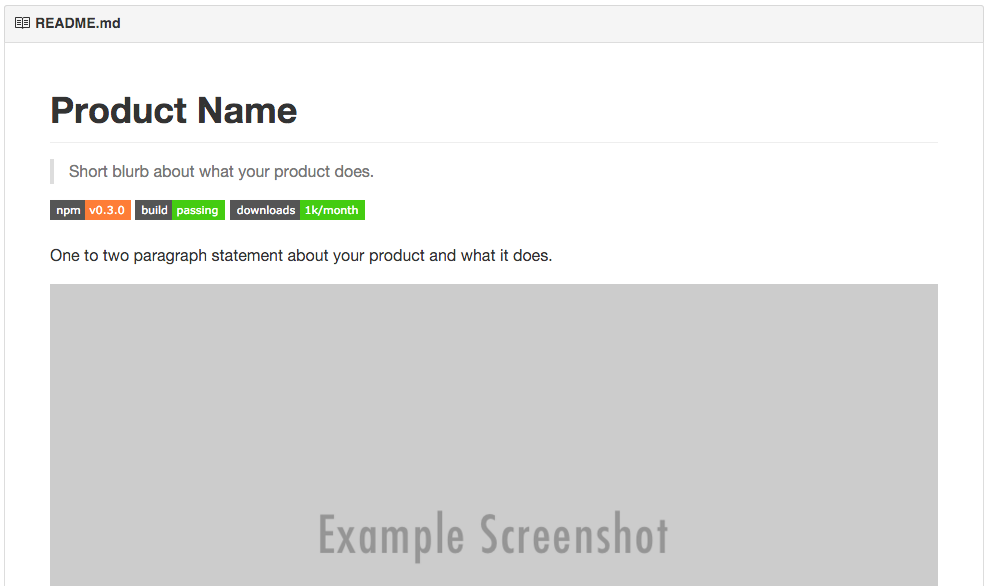
Potential users of your project should be able to figure out quickly what the purpose of the project is. Make sure to get this information across early on! A good way to do this right is by providing:
- a concise, single-paragraph blurb describing your project; and
- a representative screenshot (or even better, an animated GIF) that shows your project in action.
2. How to install it
If people like your project they’ll want to learn how they can use it. Although it may seem straightforward to you how to install your library or tool, it will trip people over and frustrate them if you don’t provide install instructions.
It sends potential users running if there are no instructions at all or if they are overly complicated. Make this step as simple as possible. A good way to provide install instructions is by:
- having a code block in your README that shows exactly what folks need to type into their shell to install your software; and
- doing this for all platforms that your software supports, if there’s a difference between them (e.g. OS X/Linux/Windows).
3. Example usage
Besides install instructions having a good usage section is essential, too. Otherwise how are people going to figure out how they can get to the good stuff after they’ve made it through the install process?
I like doing this by putting up another code block with a few useful and motivating examples. Again you’d lay out exactly what people need to type into their shell or click in the UI to get the examples working.
4. How to set up the dev environment
Because we’re talking about open-source software here, it’s key to help others make changes to your software and contribute them back to the project.
The first step down this road is helping potential contributors to set up their development environment. This helps reduce friction and avoids frustrating the people motivated to contribute.
A good way to do this is providing–you’ve guessed it–yet another code block with clear instructions for:
- installing all development dependencies; and
- running an automated test suite of some kind.
Having at least a basic test suite is important because it lets developers confirm that they’ve got their development environment set up correctly. Nothing more frustrating than wanting to play around with a cool project and being unable to build it!
5. How to ship a change
Like I said before, keeping potential contributors happy is super important. So, if somebody made it to the point where they probably enjoy your software enough to hack on it and have their development environment up and running, you’ll want to give them clear instructions on how to contribute their changes back to the project.
This should include a quick description of the general development process for the project. For example, do you accept pull-requests or want patches via email and so on.
Also, it helps to give instructions on how to build and release a new version of the software. Even if this is not something that all contributors will have to do at some point, it helps immensely to provide these instructions for the person doing the releases (i.e. often yourself).
It’s frustrating to get a great pull-request that you really want to ship and then having to spend an evening figuring out how you’re supposed to prepare a new release. Believe me I’ve been there and I started putting notes into my README files ever since 😃.
6. Change log
Users of your project want to know what changes were made compared to the last version. I know that GitHub has the “Releases” tool for this but I still like having a condensed change log in the README.
Another positive side effect of putting the change log into the README is that it becomes easy to also share the change log on package repositories like npm, or PyPI.
I usually just make a bullet list with a bullet for each release and the key changes made in that release.
What I like about this approach is that you can give credit to other contributors publicly. The README is likely the first thing that new users see and it’s nice to give contributors on the project a shoutout there. They helped make your project more awesome, so share credit where credit is due.
7. License and author info
Providing licensing and contact information is important to clarify the legal status of your project. GitHub recommends that you include a LICENSE.txt in your repository’s root directory. Although this convention exists, it’s a good idea to include a brief section in the README with:
- contact information for the author (I like Twitter and email); and
- a quick statement about the license the software is under. I usually do this by saying “XYZ is available under the $SoAndSo license. See LICENSE.txt for more information”. If you’re extra nice you can put a link to the license file.
A free README.md template for you
Hopefully this article taught you a new trick or two about writing effective README files. I try to follow these guidelines in the READMEs I write for my own projects or for clients.
To make things easier for you I put together a README.md template you can use that follows the structure laid out in this article.
You can download it here: dbader/readme-template
Please feel free to submit issues and pull-requests against this template. Let’s fight bad READMEs together and make our open-source projects more enjoyable to use 😃.

